Quform - MailChimp Integration Documentation
Documentation, Reference Materials and Tutorials for Plugin
Introduction
Quform - MailChimp Integration is an extension of Quform - WordPress Form Builder
Quform MailChimp integrates your Quform with MailChimp. In just a few clicks, you can turn your form into a powerful marketing machine.
Features:
Here you will find the main features which are included in plugin.
- Full Quform integration with MailChimp.
- Double Opt-in feature.
- Subscribe Automatically.
- Merge Tags Support.
- Pass any field or user property as merge tag.
- Better UI representation to the user.
- Extremely flexible.
- Separate Mailchimp integration for Separate Quform.
- Easy form field relation with Mailchimp merge tags.
- Light weight and easy to use.
- Global enable / disable feature for integration.
- 100% multilanguage
Installation of Plugin
- The installation of the plugin is just like any other plugin installation for WordPress. Login to your WordPress site and go to Plugins > Add New.
- At the Install Plugins Page click on Upload from the top navigation and then click on browse.
- Choose the downloaded plugin zip file and upload this zipped file. Please unzip the file first to get the plugin zip file.
- Now click on Install Now.
- Wait until WordPress has uploaded the file. If it's done click on Activate Plugin.
- Now you plugin is activated and you can see a message 'Plugin activated' at the top of the window.
Plugin Settings
Plugin settings page holds various settings. These are the global plugin settings.
General Settings

Enable Integration
Check this box if you want to enable MailChimp integration. This is a global enable / disable setting.
MailChimp API Key
Enter MailChimp api key. API key is required for this plugin to communicate with MailChimp servers. To find out more about API key click here.
Note: MailChimp API Key is required.
Once you enable the setting, app proper API key and save it, you can see MailChimp Status at below.
If your account is successfully connected then you can see message like this "Successfully connected to MailChimp account".
Integration
Integration tab holds the various MailChimp integration.

Integration
Integration tab holds the listing of MailChimp integration which you have added.
You can easily manage your interation from here like to make the integration active / deactive OR delete. You can see which from is integrated with which MailChimp List.
You can add the new integration from here as well as edit the existing one.
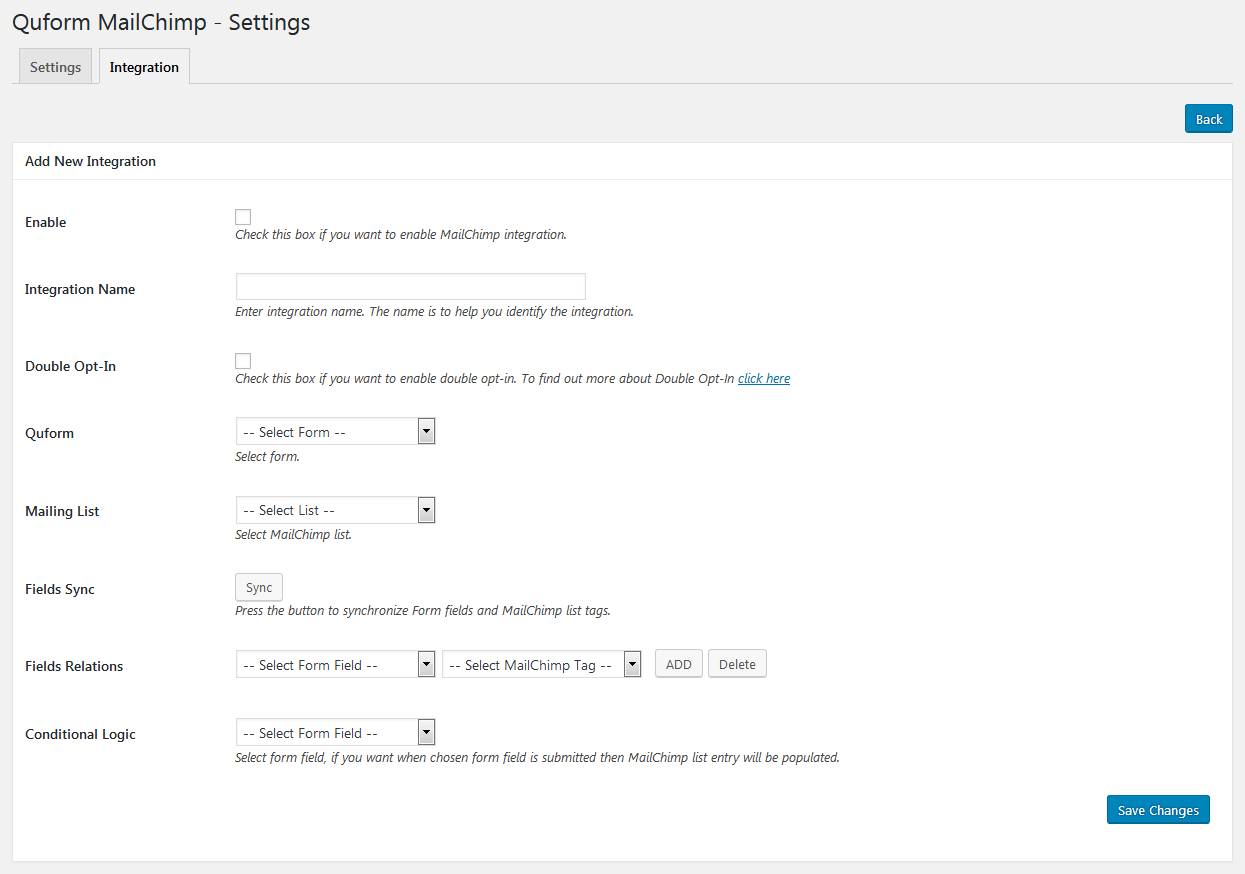
Add MailChimp Integration
Add new MailChimp integration.

Enable Integration
Check this box if you want to enable MailChimp integration.
Note : Only active integration will work.
Integration Name
Enter the integration name. The name is just to help you identify the integration.
Double Opt-In
Check this box if you want to enable double opt-in. To find out more about Double Opt-In click here.
Quform
Select appropriate Quform for which you want to enable MailChimp integration.
Mailing List
Select appropriate MailChimp mailing list for integration.
Fields Sync
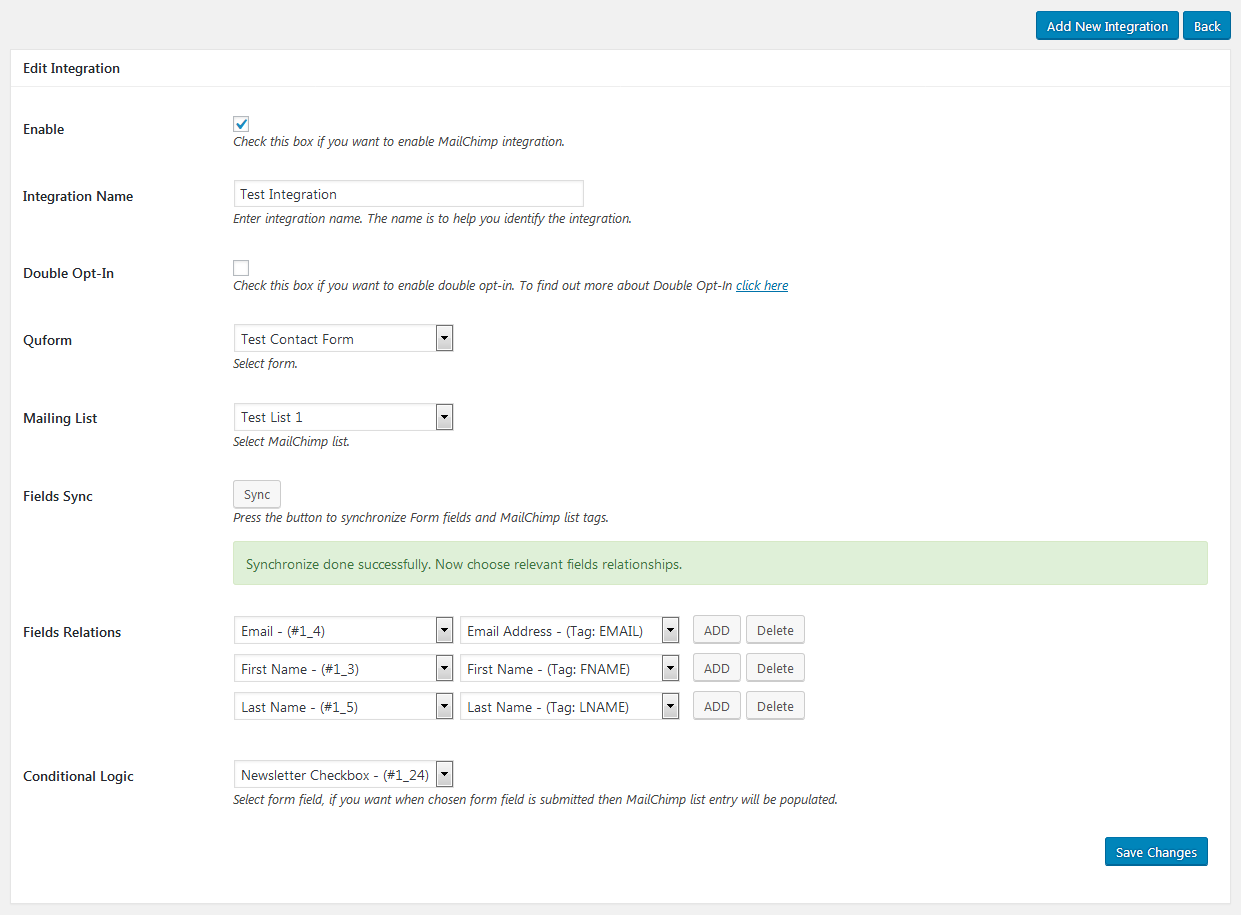
Once you choose the appropriate Quform and Mailing List then you have to press the "Sync" (synchronize) button. Basically it synchronize the Quform form fields as well as the MailChimp merge tags. Once it is done you can see data at "Fields Relations" settings.
Fields Relations
Once field "Sync" done successfully, you can see Quform form fields as well as MailChimp merge tags values in drop down.
Note : In Field Relation the Email tag must be present for MailChimp.
Conditional Logic
Once field "Sync" done successfully, you can see Quform form fields in drop down.
Select form field, if you want when chosen form field is submitted then MailChimp list entry will be populated.
Edit MailChimp Integration
Edit existing MailChimp integration. All fields will be same as "Add Integration Settings".

Can't find the answer you are looking for?
If you have any questions that are which are not listed in documentation, Feel free to get in touch with us on support@infornweb.com
